Tuesday, November 29, 2011

HP nx6110 notebook 1782 disk drive controller error solution FIXED

Had a client with a notebook I recently setup for them bring it back in for repair. Before I saw them I diagnosed from their description of the state of the computer and answers from questions I had. I had ordered a replacement lcd backlight inverter for $3 shipped from eBay and had it waiting when they delivered the pc to me. Turns out they had an IDE disk controller malfunction. Researching the history of this kind of problem for this model resulted in numerous others with just as many being sold for parts or as-is on eBay. I knew that the controller is never a seperate replaceable part aside from replacing the entire motherboard which would cost roughly the same as a whole used working model. Who's to say a working motherboard bought for replacement will not fall ad yours had and as many others had 2 seconds after installing it? So I diagnosed that the notebook is as good as trash and he must move on. I promised to not give up entirely for that is not my nature. So I messed around and noticed the optical drive would work properly with no controller errors if I removed the internal hard drive. Then searching online for my similar results I stumbled upon a simple reply by a guy who said he fixed it by removing the cd-rim drive entirely.
Light bulb.
Disk controller only allows one device at a time.
Installed hdd, removed optical via a set screw under the memory access panel.
And it's working.
USB support is fully functional so I backed up the Os using an external DVD-RW drive. And all is good.


Some history of a 1995 Honda Civic EX I know...

Bought used from a dealer in Texas for $15k. Had Eibach springs, Mugen5 exhaust muffler, factory fogs, hyper purple and carbon fiber accents within. 2 months after owning my rice racer I was released of my ownership of the cool fogs and sport muffler. Damn. 100,000 miles down the road and a couple states to the west I poorly manage the oil level and subsequently suffer what most Hondas succumb to from this malpractice: 4th cylinder connecting rod bearing failure. "I spun a bearing."

So I research, research, research, purchase the $30 set of bearings, and gather all the necessary tools. The whole process then took 2 days on and off. Today I could do it in 2 hours, tops. Why? Well upon finishing this the first time I didn't know how to tighten rod caps properly. So 1 mile down the road the cap loosens and before any damage could occur I shut it down and was towed home. Tire it apart and tightened them down tighter. 4 months down the line the tighter proved to still not be tight enough.

PostThis! International's Personalized Photo Postcard Kiosk

After stuffing myself silly with stuffing, turkey, and deviled eggs, I sat down with my friend and CEO of PostThis! International's CEO and founder, Scott McKenzie.  I'm always boasting of my ability to help others in practically any subject, concern, or need one may have.  So he presented me with a business need that was right up my alley.  He required, within a weeks time frame, to acquire an on-screen graphic image that depicted the steps a customer of the photo postcard kiosk would take to "swipe" their credit card through the kiosk's built in terminal reader.  The current setup used in the only working version, in place at a local hotel does not make this step clear.  He also was interested in an optional vinyl sticker/decal on the kiosk itself to help the customer locate the "swipe your card here" represented "on-screen". He emailed me a front view elevation photo and that was all i needed to get to work with some ideas I could present as steps to a final working model.

 I cropped the original phot to remoce the floor and background and to reveal the true ergonomic shape of the kiosk shell.  Lens distortion from the camera being so close the to kiosk made the image bulge and warp near the center of the photo, so I used Photoshop to straighten everything up and to show the reviously mentioned "wave" along the right side that was different than the relatively straight left side.
 Knowing the approximate diagonal size of the display screen allowed me to scale the photo accordingly and model it true to scale in Sketchup.  The whole kiosk was modeled using the photo as the actual CGI models color/texture.  Scott showed me an image of a silhouette of a hand swiping a card that was suggested by the kiosk manufacturer to show the nature of the swiping action.  I first designed a 1 to 2 to 3 stepped graphic (seen above) using a generic yellow outline for the swiping slot.  Yellow was replaced with a similar design used along the length of the kiosk, in the shape of two distinct arrows.

 The two separate images were combined and rendered with Twilight in sketchup. So the on-screen graphic resembled the real life as clear as possible, lights, sun shine provided some shading seen through the adjacent window, and the wall texture were also rendered. This was the first version of what I submitted to Scott for approval and his thoughts.
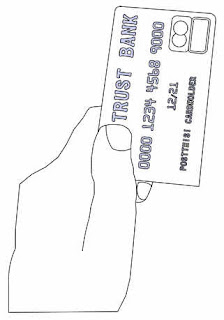
In the meantime awaiting his reply, I drew up a vector image of a hand and card that would leave him open to more than one option as he had been shown and then had shown me of this design.


Thursday, November 10, 2011

I'll build a website for discounts on tires?

I'll go to some great lengths to save a few dollars these days.  I met a tire shop owner in Santa Ana who seemed to have a good head on his shoulders and offered a good service that I appreciated.  I asked him if he had a website that he could link to his online yellow pages directory listings. He replied that he didn't know how he would do that; so I promised him that the next time I saw him that I'd "set him straight" and I get fitted for 4 semi-new tires in the morning.  This is a mock-up of a simple landing page he could use for online directory listings and for google search.  I used the 5 photos he had personally uploaded to the google maps directory listing he claimed as the owner of. I took cues from the business card's design that he gave me the first time we met.  I sent him a MMS picture message with this graphic and he replied, "WOW, that's cool!"

Monday, October 31, 2011

Coto de Casa Townhome Master Bath Remodel


I was asked to make a 3D rendering of the proposed bathroom.  I started out with photos of the original bathroom and submitted the renderings seen above; the final result for each view is seen in each following image,

Sunday, October 30, 2011

Corona Pergola Idea, Visualization, Construction Realization

When I was contracted to build two pergolas, I had a good idea of what I could accomplish with the given materials and time allotted. I began with the smaller pergola which was to straddle a curving walkway on the far side of the property. This is a near finished pergola simply missing the top few sections of wood.  The contractor was not satisfied with my design and had another worker come it and remake the entire top section of the pergola.  I took the wood that was removed from my design and compared it to the new design only to find that they were exactly the same except for the shape of the end cut.  I showed the contractor that he had been taken for an entire days labor by a copycat carpenter. This contractor does this all the time.  At least it wasn't any loss of mine.